You've connected Google Analytics to Shopify, opened your store, and watched a visit appear in Realtime. Then you check revenue and find missing orders, unexpected payment referrals, or purchases that don't match Shopify. The tag works, but you still can't trust the reports.
Knowing how to set up Google Analytics means finishing three linked jobs: choosing a clean installation route, sending purchase events that reconcile with orders, and enforcing consent before collection begins. A page view proves connectivity. It doesn't prove checkout coverage, accurate revenue, or permission to collect data.
Table of Contents
- Pick the Right Installation Method for Your Store
- Create Your GA4 Property and Measurement ID
- Track Purchases With Ecommerce Events
- Set Consent Rules Before Your Tags Fire
- Test Events, Reconcile Revenue and Fix Common Errors
- Link GA4 to Google Ads for Conversion Data
Pick the Right Installation Method for Your Store
Installation methods compared for Shopify
| Method | Best for | Checkout and ecommerce events | Consent control | Effort |
|---|---|---|---|---|
| Shopify built-in connection | Single store on standard checkout | Standard ecommerce events, including purchase | Shopify privacy settings and your cookie banner | Low |
| Theme code (gtag snippet) | One store with custom storefront events | Storefront events only, not checkout | Your code must read the consent state | Medium |
| Google Tag Manager | Multiple tools, agencies, complex consent rules | Whatever you configure, with checkout steps depending on Shopify customer events | Consent Mode set inside the container | High |
Shopify's connection through the Google & YouTube app is the practical starting point for a standard store because you're not maintaining a separate storefront ecommerce implementation. Its limitation is control: you must inspect what the integration sends rather than assume every custom interaction is covered.
Connect the business-owned Google account, select the intended GA4 property, and check the connected destination before enabling collection. Review Shopify's customer privacy settings and test the banner on the live storefront. An integration being enabled isn't proof that its consent behavior matches your requirements.
Choose flexibility only when you need it
Theme code gives a developer direct control over storefront events without maintaining a Tag Manager container. The trade-off is checkout coverage: a snippet in the theme's <head> doesn't extend that theme into Shopify checkout.
Use this route for deliberately scoped storefront measurement, not as a complete ecommerce shortcut. Document the file containing the snippet, its Measurement ID, and the mechanism responsible for checkout events. Otherwise, a later developer can easily add another installation without realizing one already exists.
Google Tag Manager centralizes tags, supports consent configuration, and provides version history. Its trade-off is maintenance: someone must own triggers, consent settings, testing, and publishing.
A container also doesn't bypass Shopify's checkout restrictions. Customer events and the supported integration architecture still determine which checkout interactions are available.
Practical rule: Give every event a named owner. An app and a container can coexist, but they shouldn't independently send the same purchase.
I would start a standard single store with the built-in connection. Add Tag Manager when another marketing tool, custom event requirement, or more complex consent rule justifies the operational overhead, not because it offers more settings.
Create Your GA4 Property and Measurement ID
Start new implementations with GA4, not Universal Analytics. More importantly, create the property under an account your business controls. An agency can receive access without becoming the only party able to manage your measurement.
Adoption alone doesn't make an implementation trustworthy. The W3Techs Google Analytics comparison measures technology presence, not whether a merchant's event parameters, attribution, or consent settings are correct.
Create the destination before installing the tag
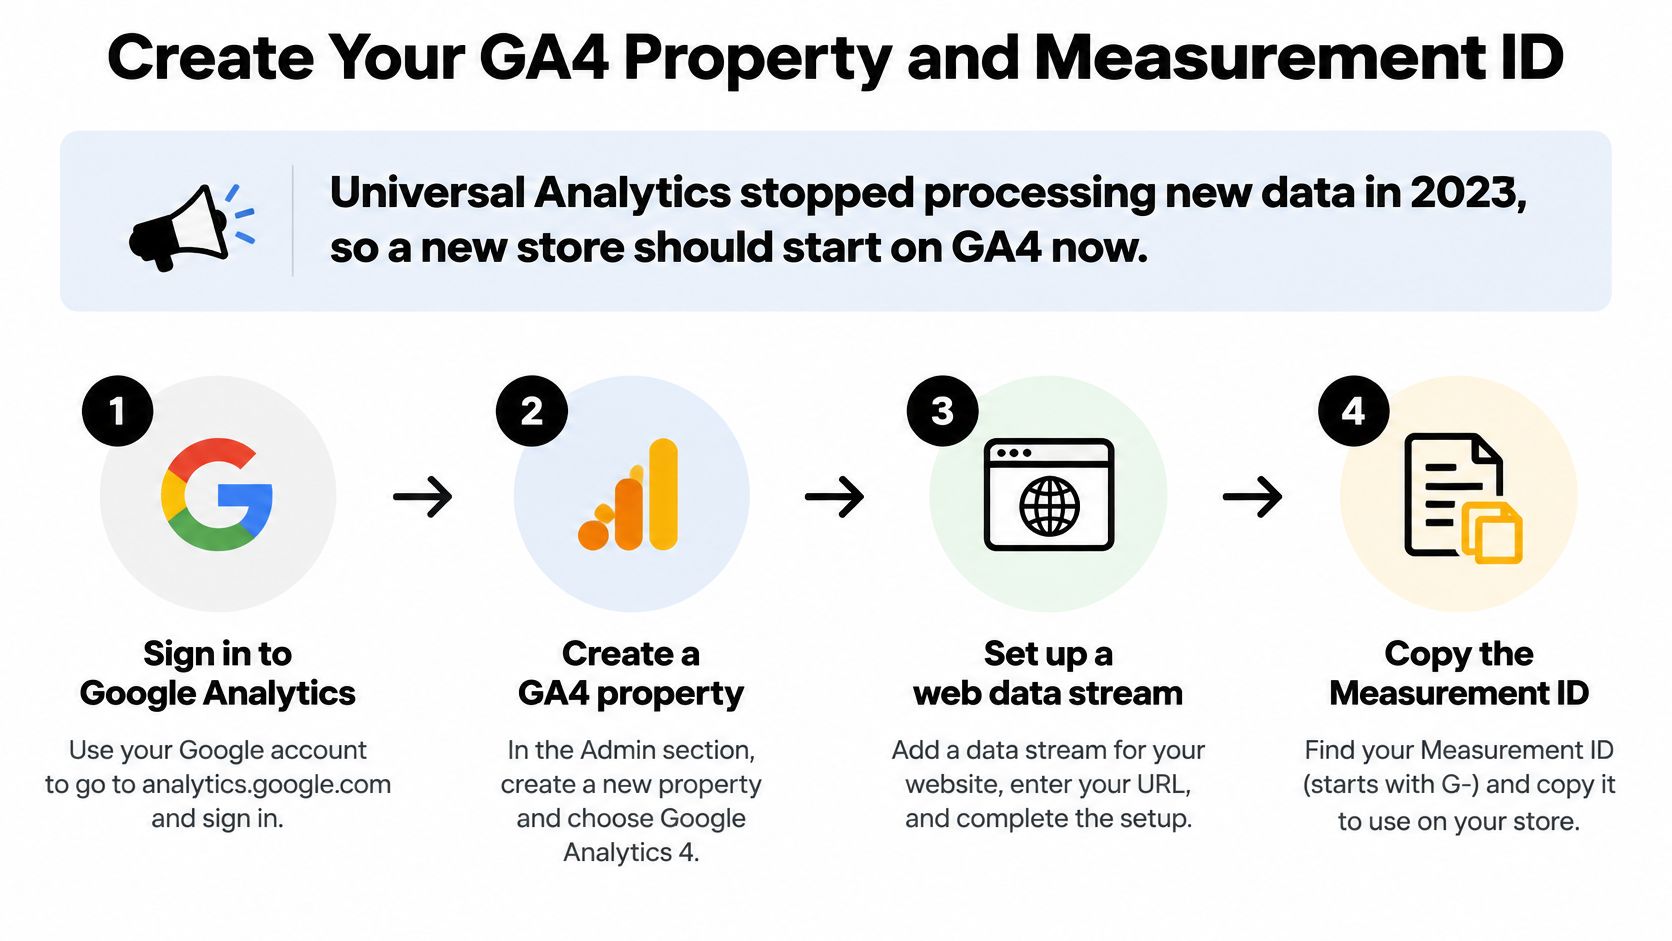
Open Google Analytics and select Admin. Sign in with the Google account your business will retain, then check whether an appropriate account and property already exist.
Under Create, choose Account if you need a business-level account. Name it after the business and review the account data-sharing choices rather than accepting settings without checking them.
Create a Property, give it a recognizable store name, and set the Reporting time zone and Currency to match your reporting conventions in Shopify. Complete the business information and objectives prompts.
Open Data streams, choose Web, and enter your storefront address with the correct HTTPS protocol. Give the stream a name that distinguishes the production storefront from any testing environment.
Open the stream details and copy the Measurement ID, which starts with
G-. Use that exact value in your selected installation route; it isn't the same as a Tag Manager container ID.Review Enhanced measurement and leave relevant interactions enabled. Check the settings for page views, scrolling, and site search against how your storefront behaves.
Use this visual as a quick reference for the account-to-stream setup sequence.
Avoid creating a second reporting destination by accident
Check the existing stream list before adding anything. Another stream doesn't automatically create another property or split traffic, but sending events to inconsistent destinations makes reports harder to interpret. Sending the same interactions through overlapping tags can also inflate collection.
Write a short measurement plan alongside the setup. Separate acquisition questions, such as which landing pages attract organic visitors, from commercial questions, such as which products those visitors buy.
For each business action, record its event name, required parameters, implementation owner, and validation method. Keep newsletter subscriptions and other secondary actions distinct from completed purchases so marketing teams don't confuse engagement with sales.
After connecting the chosen installation route, visit the storefront with the appropriate consent granted and inspect Realtime. Success means your activity reaches the intended property and the installed Measurement ID matches the stream you created, not merely that some Analytics account shows activity.
Track Purchases With Ecommerce Events
Core ecommerce events and their parameters
| Event | Fires when | Parameters to send |
|---|---|---|
add_to_cart |
A product is added to the cart | items, value, currency |
begin_checkout |
The checkout opens | items, value, currency, coupon when applicable |
add_shipping_info |
A shipping method is chosen | items, value, currency, shipping_tier when available |
add_payment_info |
A payment method is chosen | items, value, currency, payment_type when available |
purchase |
The order reaches your defined confirmed-purchase state | transaction_id, value, currency, tax, shipping, coupon when applicable, items |
Use the funnel illustration to map customer actions to the events you expect to receive.
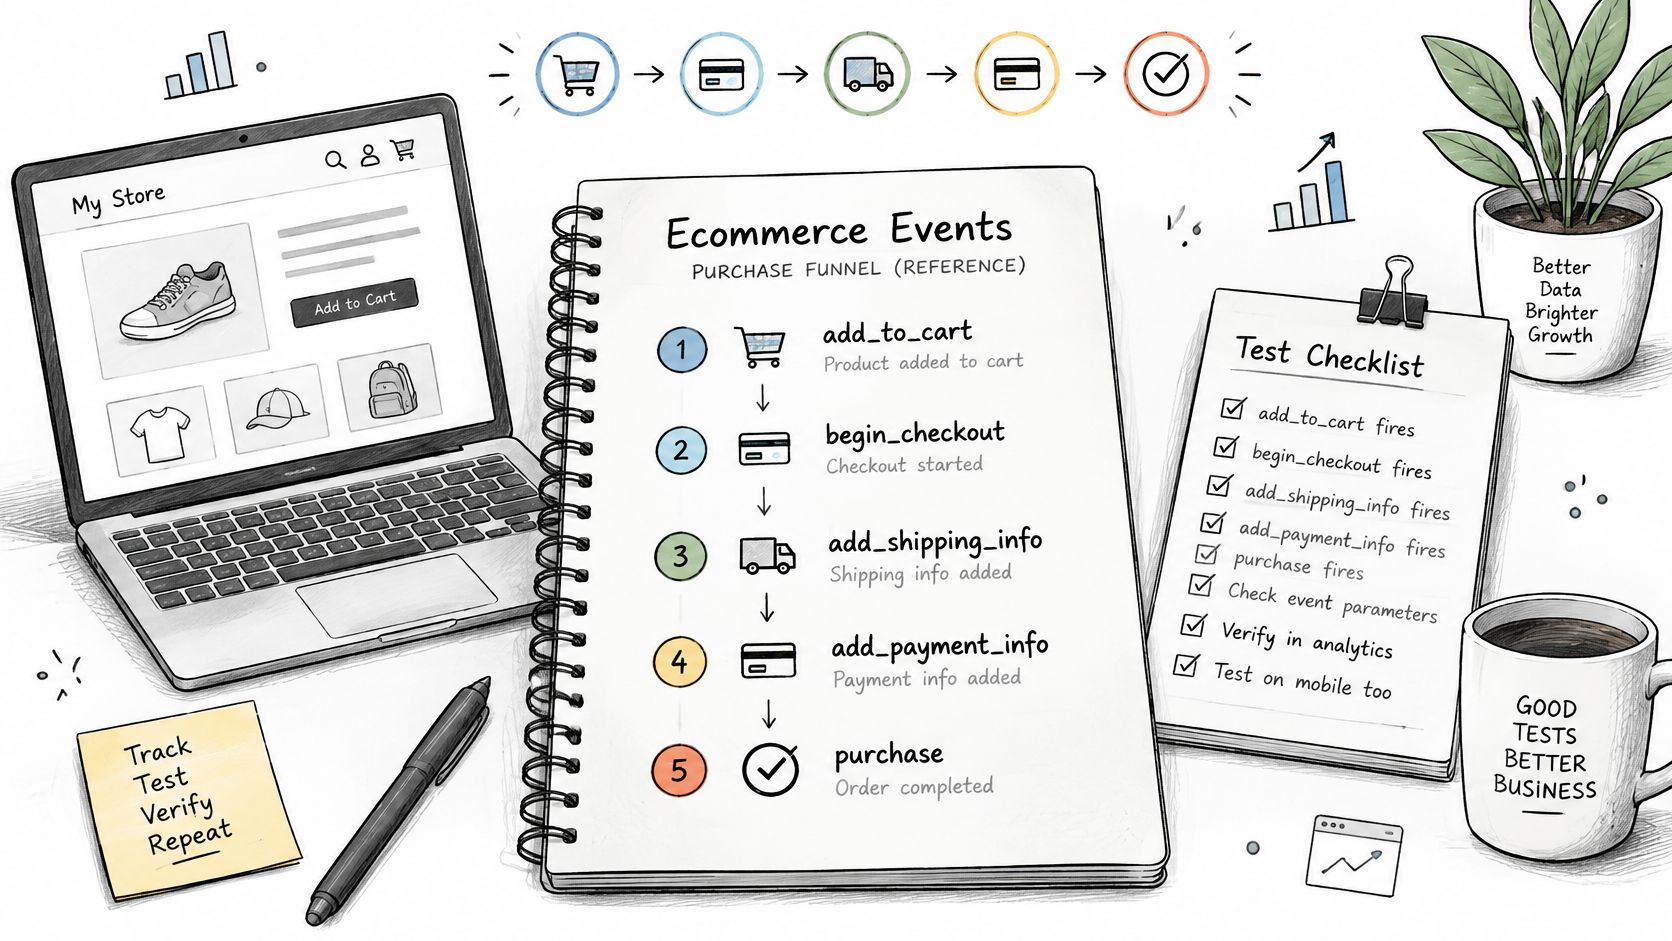
These ecommerce events aren't collected automatically just because the base tag is installed; the store must send them, and Google's ecommerce implementation guidance notes that ecommerce data commonly begins appearing within 24–48 hours after interaction with a correctly tagged website or app.
Your Shopify integration or custom implementation must therefore supply structured purchase information. Enhanced measurement isn't an ecommerce implementation. It won't turn a checkout page view into an accurate purchase record.
Make the transaction identifiable
The items array describes what the shopper interacted with. Include consistent product or variant identifiers, item names, prices, and quantities so you can connect product engagement with completed sales.
For purchase, use a stable, nonempty transaction_id that maps back to the Shopify order. A Shopify order number can serve that purpose, but don't replace a working integration's stable order identifier merely to change its appearance.
The important requirement is consistency. Refreshing the confirmation page must not generate a fresh identifier, and a backend process must not describe the same order using an unrelated ID.
A transaction ID supports deduplication. It doesn't replace controlling which systems are allowed to send purchases.
Also define when your store considers a purchase complete. Immediate card payments, delayed payment methods, and manual capture don't necessarily reach the paid state at the same point in the customer journey.
Keep value and currency aligned
Send currency whenever you send monetary value, using the currency of that event's amount. Don't attach a presentment-currency amount to your store's base-currency code.
Keep merchandise value, shipping, and tax separate according to your event schema. Comparing an event's merchandise value directly with Shopify's tax-and-shipping-inclusive order total creates a mismatch even when both systems received the correct information.
For a video walkthrough, use this alongside your own event inspection rather than treating the demonstration as proof that your store is configured.
Before relying on ecommerce reports, place a test order and inspect the received purchase parameters. Match its identifier, merchandise value, tax, shipping, currency, and items against the corresponding fields in Shopify Admin.
Set Consent Rules Before Your Tags Fire
A cookie banner alone doesn't enforce consent. A visitor can reject analytics while a poorly configured tag continues collecting under the wrong consent state.
The implementation needs a complete sequence: collect the visitor's choice, communicate it through Consent Mode, and verify that tags respect it. Google's consent documentation distinguishes storage and advertising signals and explains how consent-aware measurement can support modeling where applicable.
Translate the visitor's choice into technical settings
analytics_storagecontrols storage related to analytics, such as measurement cookies.ad_storagecontrols storage related to advertising.ad_user_datacommunicates consent for sending user data to Google for advertising purposes.ad_personalizationcommunicates consent for personalized advertising.
Set defaults before measurement tags execute, then update them when the visitor makes a choice. A banner that updates consent after tags have already used an unintended granted state leaves a gap at the start of the visit.
Don't copy another store's regional defaults. Ask a qualified legal adviser to define the requirements for your markets, then translate those requirements into the banner, Shopify customer privacy settings, and tag configuration.
Your implementation also needs an explicit choice about whether tags are blocked before consent or permitted to send consent-aware requests without storage. Those are different technical behaviors, and the right choice requires both legal and implementation review.
Test rejection as carefully as acceptance
Shopify checkout must be part of the consent test. Confirm that the customer's choice carries through the journey and that checkout-related collection does not use different rules without notice.
Use Tag Assistant to inspect default and updated consent states. Test acceptance, rejection, a changed preference, and a return visit; inspect requests and storage behavior rather than judging only whether the banner disappears.
Your first-party data strategy should document collection purposes and permitted uses. Data collected directly from customers still needs appropriate governance.
Before launch: Write down what may run before a choice, what changes after rejection, and who approves future changes.
A decline in reported conversions after enforcing consent doesn't automatically mean marketing got worse. Record the implementation date, a comparable reporting baseline, and consent acceptance information so analysts can distinguish collection changes from customer behavior.
Where reports include modeled results, identify them as such when that distinction is available. Don't describe estimates as individually observed purchases, and don't promise that modeling will recover every unobserved order.
Test Events, Reconcile Revenue and Fix Common Errors
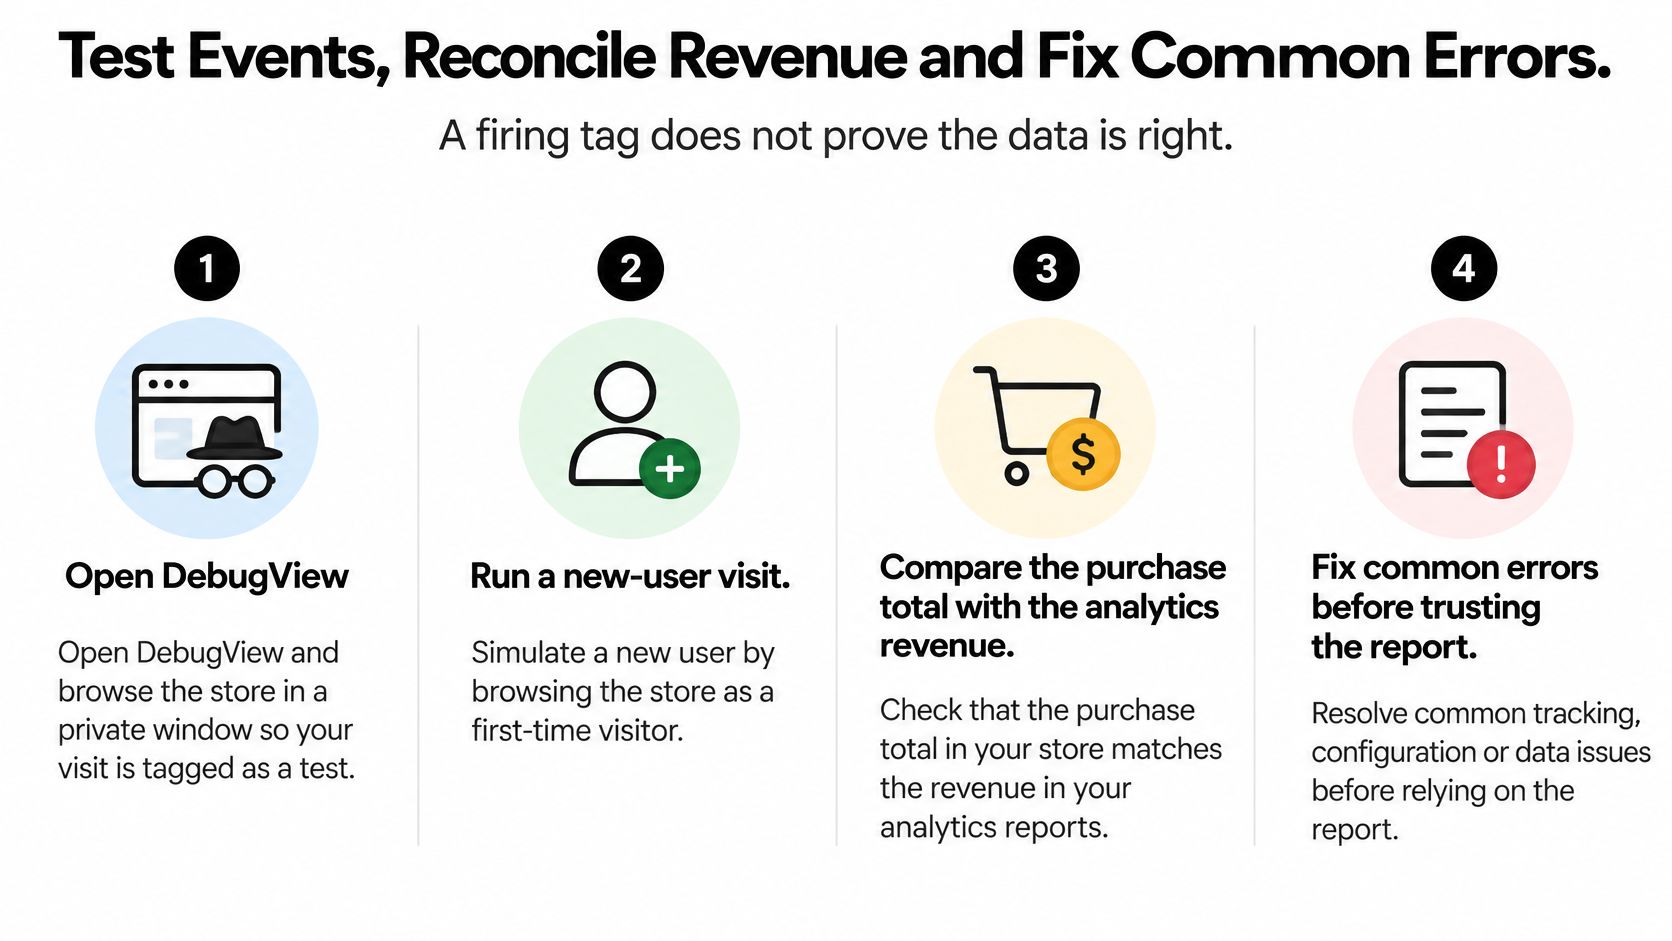
A firing tag doesn't prove the data is right. Validation must establish that the intended event arrived, carried the right parameters, and represented the correct business action.
Use this checklist to organize the test, but keep the actual event payloads and Shopify order records as your evidence.
Run an end-to-end acceptance test
Enable debug mode, then open DebugView. Use Tag Assistant or your implementation's debugging mechanism and browse in a private window. Private browsing alone doesn't mark events as debug traffic.
Run new-user and returning-user journeys, a visit through a UTM-tagged campaign URL, and a session with cookies rejected. Include mobile behavior and back-button navigation.
Add a product, begin checkout, abandon it, and test a failed payment before completing an order. Inspect the parameters on each intended event rather than checking only its name.
Reload the confirmation page and revisit it through browser history. Confirm the purchase isn't counted again and its transaction identifier stays unchanged.
Process a refund and inspect the reporting path responsible for recording it. Document how cancellations, partial refunds, and delayed captures should be treated.
Inventory the hostnames involved in storefront, checkout, and payment steps. Apply cross-domain measurement where appropriate and configure unwanted payment referrals without assuming that referral exclusion alone preserves identity.
Google's cross-domain measurement guidance explains the configuration needed when a journey crosses domains. Test the complete redirect path, including whether campaign information and measurement identifiers survive it.
Diagnose the symptom before changing the implementation
Symptoms, causes and fixes for GA4 on Shopify
| Symptom | Likely cause | Fix |
|---|---|---|
| No data in Realtime | Wrong Measurement ID, blocked collection, or consent preventing collection | Check the G- ID and consent state, then test in a private window with the blocker off |
| Purchases counted twice | Confirmation-page behavior or overlapping purchase senders | Verify the stable Shopify order identifier and allow only the designated route to send purchase |
| GA4 revenue lower than Shopify | Different revenue definitions, consent loss, refunds, discounts, or currency mismatch | Compare equivalent revenue fields by day and currency; keep Shopify as the revenue source |
| Ecommerce report empty after two days | Events not sent or items array missing |
Inspect DebugView payloads, event names, and item parameters |
| Google Ads conversions missing | Purchase configuration, import, or account-link problem | Check purchase key-event status, the Google Ads link, and the imported conversion action |
Start with the smallest explanation that fits the evidence. If events disappear after a theme deployment, inspect the release and tag changes before treating the change as a loss of customer demand.
Reconcile against commerce records
Shopify or your payment system should remain the financial source of truth. Use GA4 for customer behavior, attribution, and funnel analysis, then reconcile it against commerce records rather than expecting universal equality.
Build an exception report around order identifier, date, currency, merchandise value, shipping, tax, and refund status. Compare like with like: purchase revenue isn't interchangeable with total revenue, and a reporting-day boundary can differ from an order's operational date.
The Google Analytics developer documentation covers ecommerce implementation and server-side collection options. Measurement Protocol can support suitable backend or post-purchase events, but validate payloads and preserve identifiers before adding another sender.
A backend event must not become a workaround for consent restrictions. Assign browser and server responsibilities explicitly, and prevent the same action from entering reporting through overlapping pipelines.
Use a documented customer data integration process to keep identifier mapping, event ownership, and financial definitions consistent. Agree an acceptable discrepancy tolerance based on consent behavior and the store's actual payment flow.
Once measurement is dependable, it can support optimization decisions. Most stores get the quickest SEO win from our ALT SEO and RANKit apps because missing alt text and weak meta tags are common and easy to fix in bulk; evaluate subsequent traffic quality through product engagement and purchases, not page views alone.
The pass condition is concrete: the test order reconciles field by field, intended events aren't duplicated, consent behavior matches the written decision, and ongoing discrepancies stay within your agreed tolerance.
Link GA4 to Google Ads for Conversion Data
Choose a deliberate purchase conversion source for bidding. Importing a GA4 purchase and running a native Google Ads purchase conversion as separate primary actions can cause the same order to influence optimization twice.
Parallel measurement can be useful for comparison, but designate the bidding action clearly and keep diagnostic actions secondary where appropriate.
Connect the account and verify the conversion action
In GA4, open Admin, then Product links, then Google Ads links. Start a link using an account with the necessary permissions.
Select the Google Ads account responsible for your campaigns. Confirm the account identity before completing the connection.
Enable personalized advertising only when your consent implementation and permitted uses allow it. Linking accounts doesn't grant permission to use customer data.
In GA4's Events settings, verify that
purchaseis treated as a key event. Check the existing configuration before creating anything new.In Google Ads, create or import the conversion action from the linked GA4 property. Inspect its source, value settings, counting settings, and primary or secondary status.
Review the available attribution model and campaign goals. Choose settings deliberately rather than assuming that linking the accounts configures bidding correctly.
Treat the link as the start of a validated reporting workflow, not a way to reconstruct missing historical events. Allow for processing before diagnosing a missing conversion, and inspect conversion status before changing tags again.
For a separate identity-matching review, Product Metrics provides A practical guide to setting up and checking enhanced conversions. Use that distinction to avoid treating enhanced conversions and server-side collection as interchangeable fixes.
Apply reliable conversion values to your Google Shopping optimization decisions rather than optimizing campaigns against unverified revenue.
Place a test order through an appropriate test journey, then verify the eligible conversion's value and currency against the corresponding Shopify fields.
We build Shopify SEO apps and custom automations that help merchants connect growth work with measurable business outcomes. Visit Yassine Malti to explore ready-made tools or discuss a custom integration for your store's reporting and operational workflows.
Shopify apps by Yassine Malti
Put this into practice
-

ALT SEO · Image alt text
AI alt text for every product image · 100 images/month free
-

RANKit · Meta titles & descriptions
AI meta titles and descriptions, sized for Google · 50 meta tags/month free
-

TAGit · Product tags
SEO-friendly product tags, generated in bulk · 50 tags/month free